
 |
DNA Extraction Lab |
 |
Here is a video of our lab in case you missed the class period: DNA Extraction Lab Video
This video will take the place of the activities we did during the lab. It will show exactly what we did in class and has all the information needed to complete the assignment on JupiterEd.
Background Information:
What does DNA stand for?
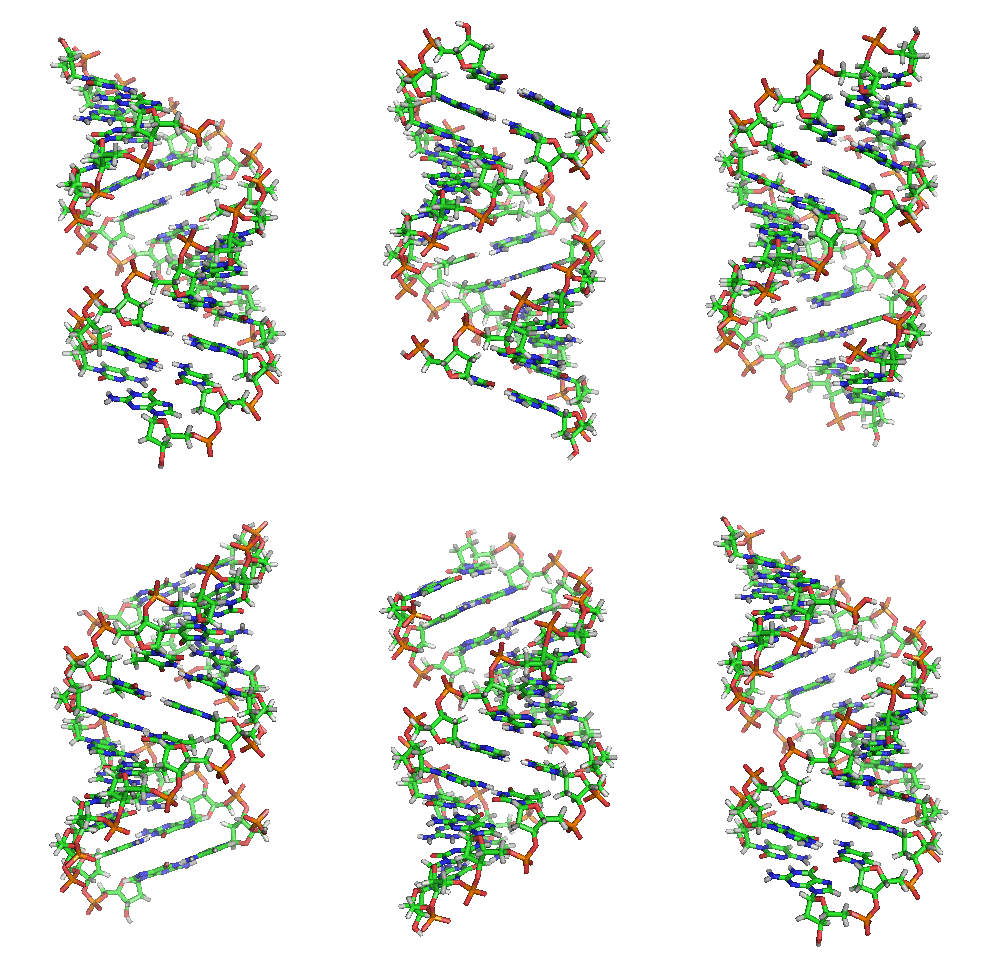
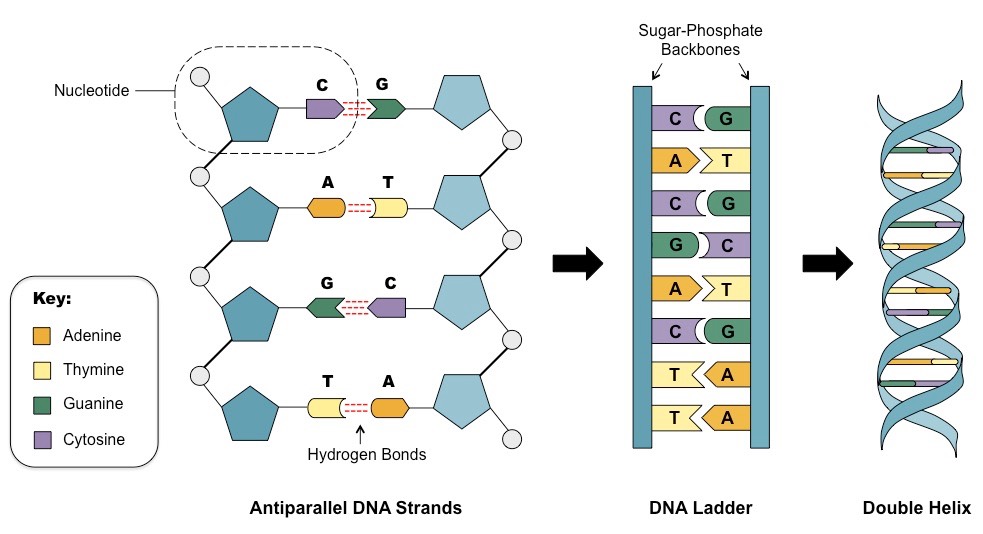
DNA stands for deoxyribonucleic acid. DNA is a molecule in the form of a double helix, which means that it resembles two spirals twisting around each other. These spirals are the backbone of the DNA molecule and are made up of sugar and phosphate molecules. The specific sugar molecule is called ribose. Ribose is a 5-carbon sugar molecule. The spirals are connected by chemicals known as nitrogen bases. These nitrogen bases stretch between the spirals like the rungs of a ladder or the steps of spiral staircase. DNA has four types of nitrogen bases:
Adenine (A)
Thymine (T)
Cytosine (C)
Guanine (G)
The sugar and phosphate spirals are connected by these nitrogen bases in the middle as they form bonds. These bonds are referred to as hydrogen bonds because the hydrogen molecules on each of the opposite nitrogen bases are attracted to each other. These are relatively weak bonds that are quickly broken as the DNA "unzips" in the middle to separate during DNA replication. The nitrogen bases will always join together and form bonds the same way:
Adenine will always bond with thymine to form an A-T or T-A bond
Cytosine will always bond with guanine to form a C-G or G-C bond
What does DNA do?
DNA is the genetic construction manual for making an organism. All processes in the organism are controlled by DNA. A gene is a sequence of DNA. A gene is defined as the basic unit of heredity that occupies a specific location on a chromosome. Each consists of nucleotides arranged in a linear manner. Most genes code for a specific protein or segment of protein leading to a particular characteristic or function.
Do we have genes in common with other organisms?
We don't look much like a fly or a worm. But believe it or not, we share genes with both of them.....and with every other living organism. Scientists study the genes in bacteria, fish, chimpanzees and other living things to learn more about humans. This is how much DNA we share with these living organisms:
Fruit fly 36%
Chimpanzee 98%
Zebrafish 85%
Bacteria 7%
Mustard Grass 15%
Round Worm 21%
What will we do in today's activity?
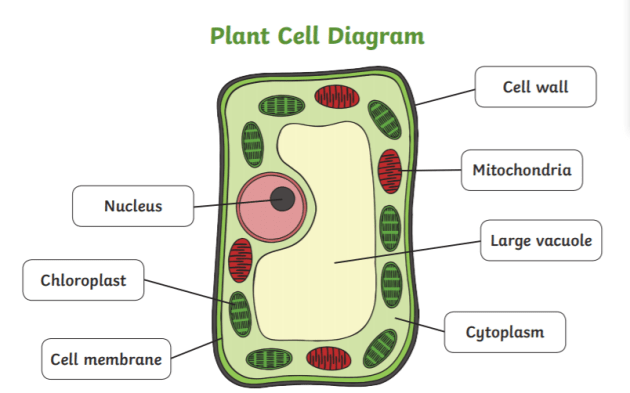
This lab activity will allow you to easily extract and observe the DNA found in plant cells. You will be able to extract the DNA from a strawberry (or raspberry). DNA in a plant cell is about 100,000 times as long as the cell itself. However, DNA only takes up about 10% of the cell's volume. This is because DNA molecules are full of twists and turns and are packed and compacted into chromosomes in the cell's nucleus. The unique double helix shape of the DNA molecule allows the molecule to minimize its volume in the nucleus. The twists and turns helps the molecule fit snuggly within the tiny nucleus of the cell. The chromosomes which are made of DNA are in the nucleus where it is the only place in the cell where DNA is found. In order to release the DNA contained in the nucleus, it is necessary to get through the following three barriers in plant cells:
1. the cell wall
2. the cell membrane
3. the nuclear membrane
You can see these structures on the diagram shown below:
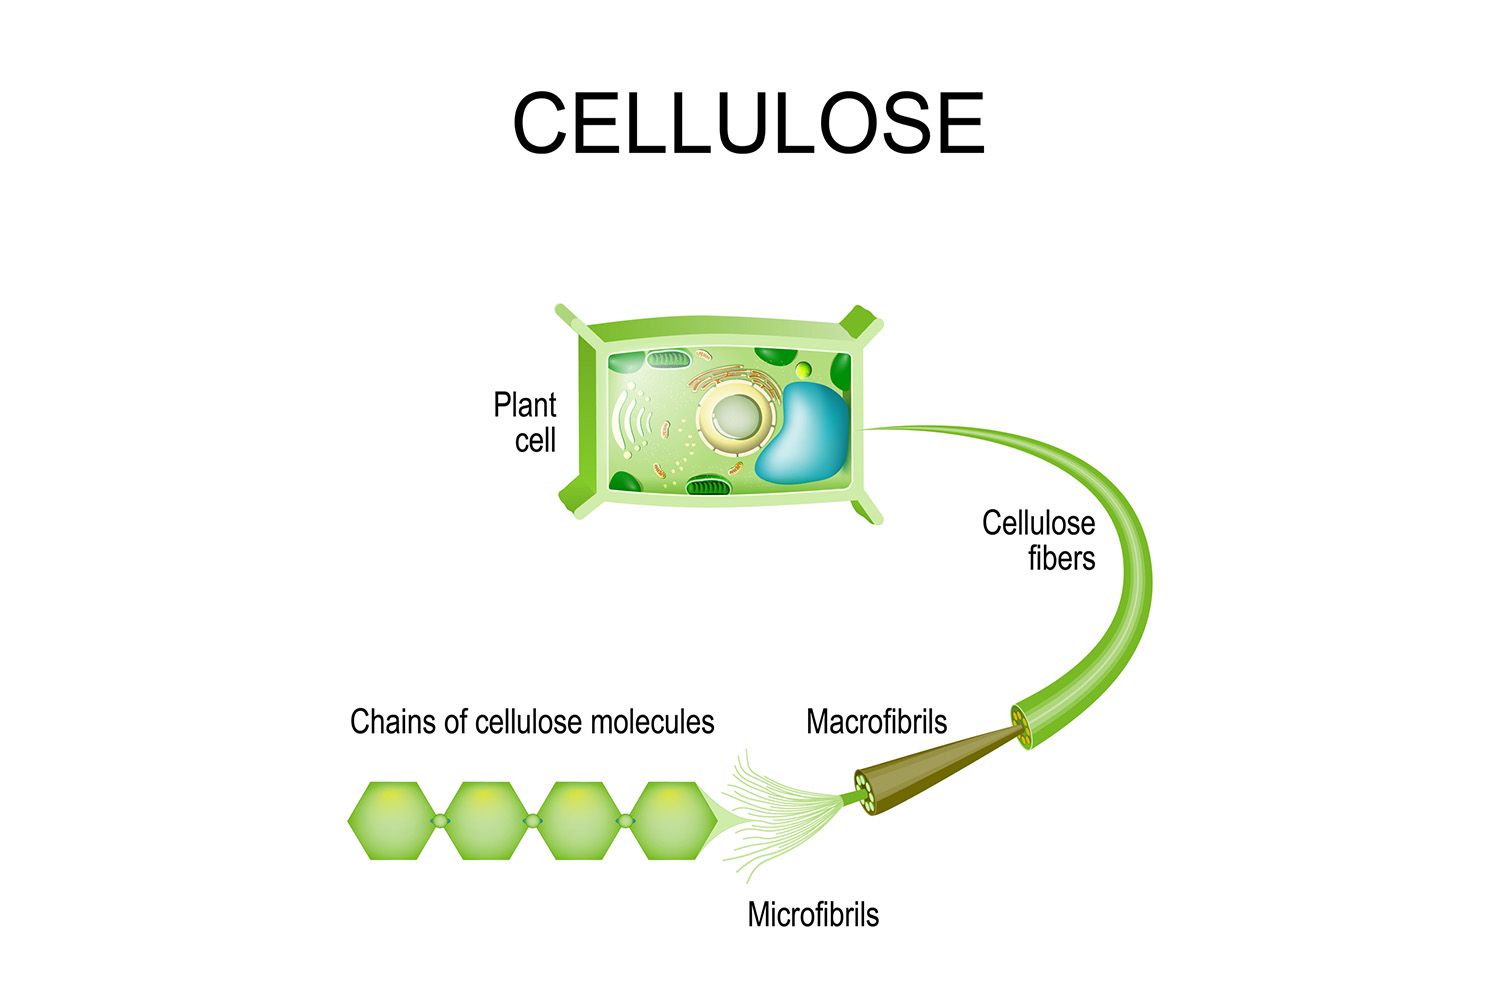
The toughest barrier to break through is the cell wall. Cell walls are composed of cellulose which provide an extremely tough and protective barrier to protect the cell. Cellulose is a polymer that is composed of many sugar molecules in a repeating pattern. In order to break this down, some mechanical crushing and mashing will be necessary to break open these cell walls and allow the contents to spill out. This will be done when you place the berry in the plastic baggie and mash it up into a "smoothie-like texture". You can also break the cell walls by placing the berries in the freezer. Click HERE to learn why freezing breaks the cell walls of plants. Today, however, you have fresh berries so you will have to manually crush them to rupture the cell walls. See the diagram below of the cellular structure of the cellulose that is found in plants.
Plant cells also have cell membranes that encase their contents. They are composed of a double layer of phospholipid molecules. You learned earlier that the cell membranes are able to allow the movement and transfer of certain ions and substances in and out of the cell. This property of the cell membrane is known as "semi-permeability". See the diagram below of the phospholipid molecules in the cell membrane structure.
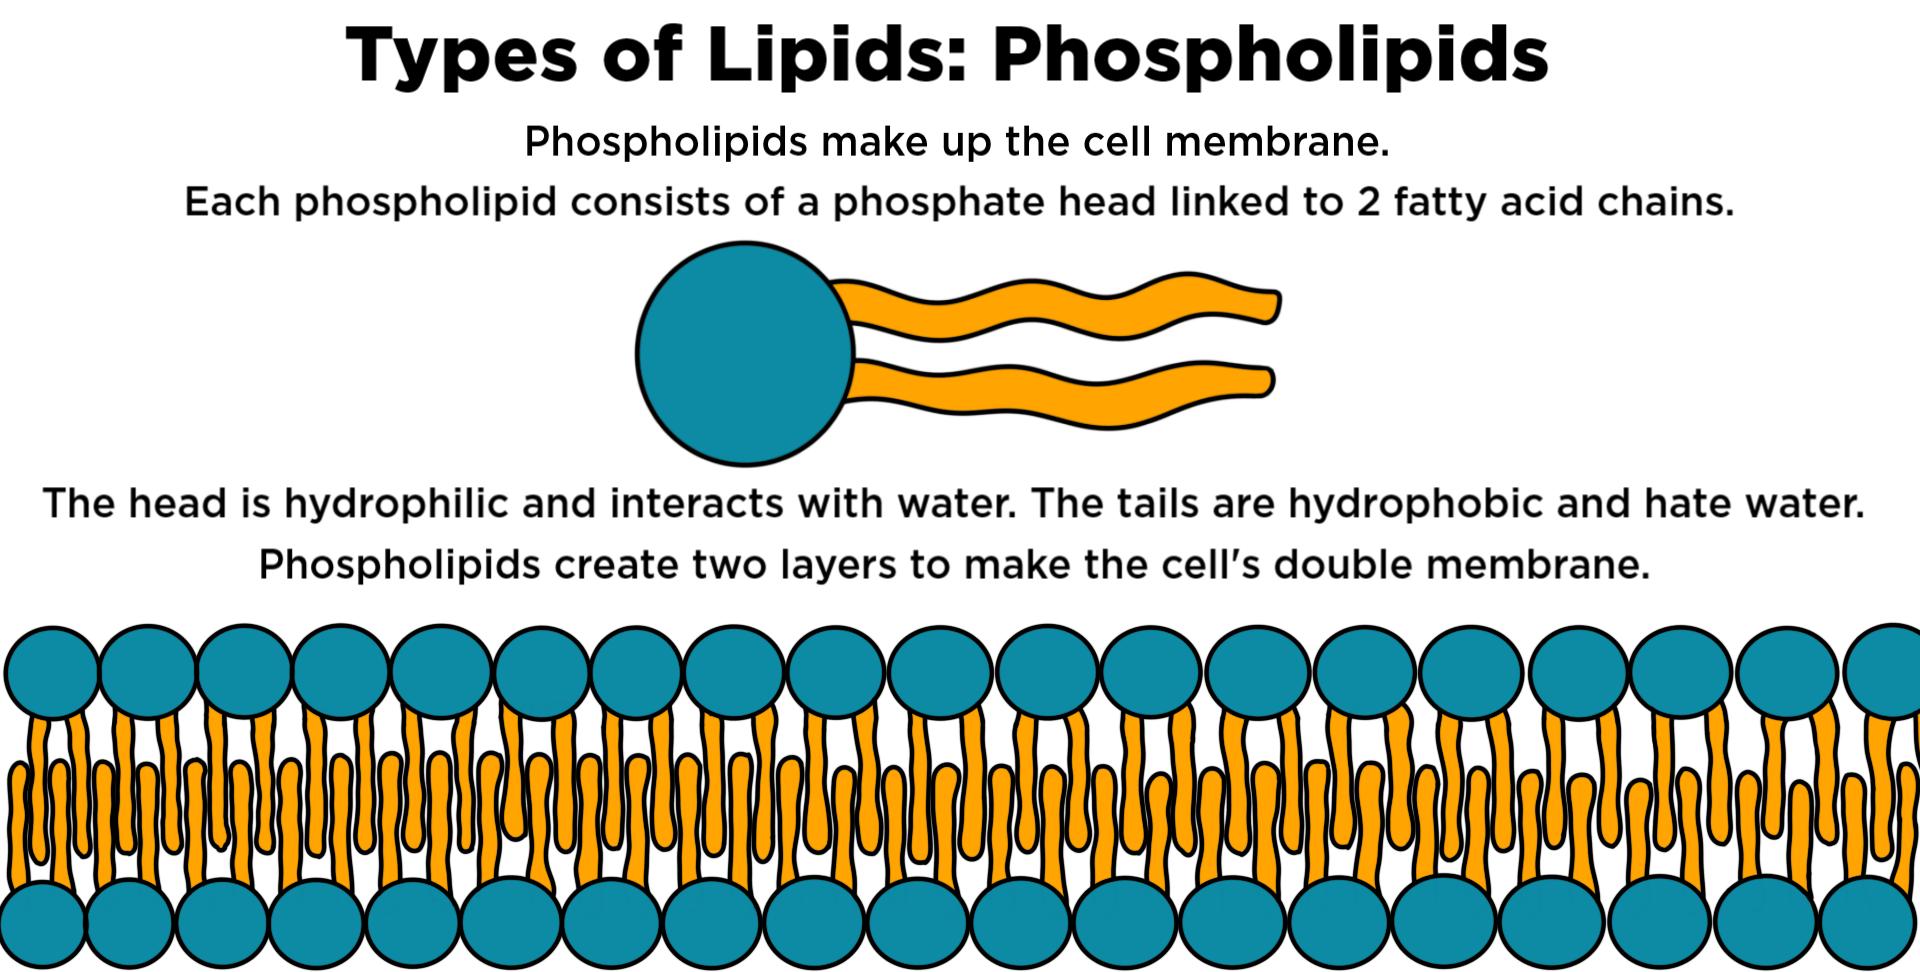
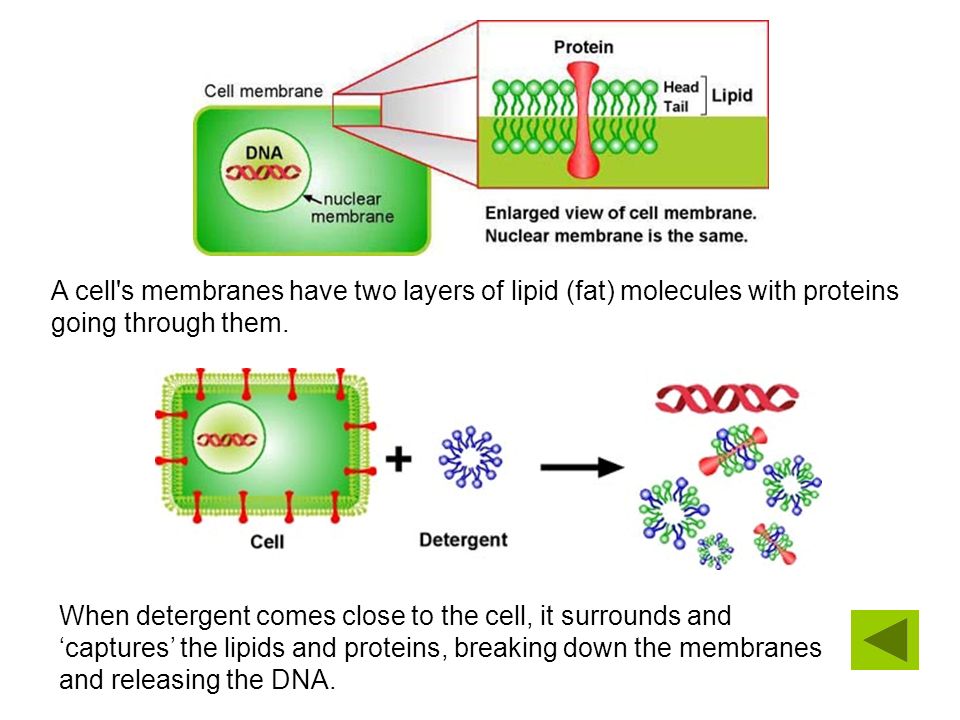
In order to break apart these phospholipid molecules a special solution is necessary. This solution is called "Cell Lysis Solution". This solution is basically dish detergent dissolved in a small amount of water. The word "lysis" means to "break open" which is what the detergent is able to do to the phospholipids. The fatty acid tails of the phospholipid molecules dissolve in the soapy detergent and then the cell contents are released. This solution also works on the nuclear membrane because this barrier is made of the same phospholipids that the cell membrane is composed of as well. Once added, the Cell Lysis Solution will allow the contents of the cell and the nucleus to be released from the cell and will then be loose in the solution of mashed up berries and the soapy detergent.
To be able to see the DNA it must be "precipitated". Precipitated means to cause substances in a liquid solution to become a solid. In your lab activity today, you will cause this DNA that is in the liquid solution to become a solid so that you can observe it.

Materials Needed List:
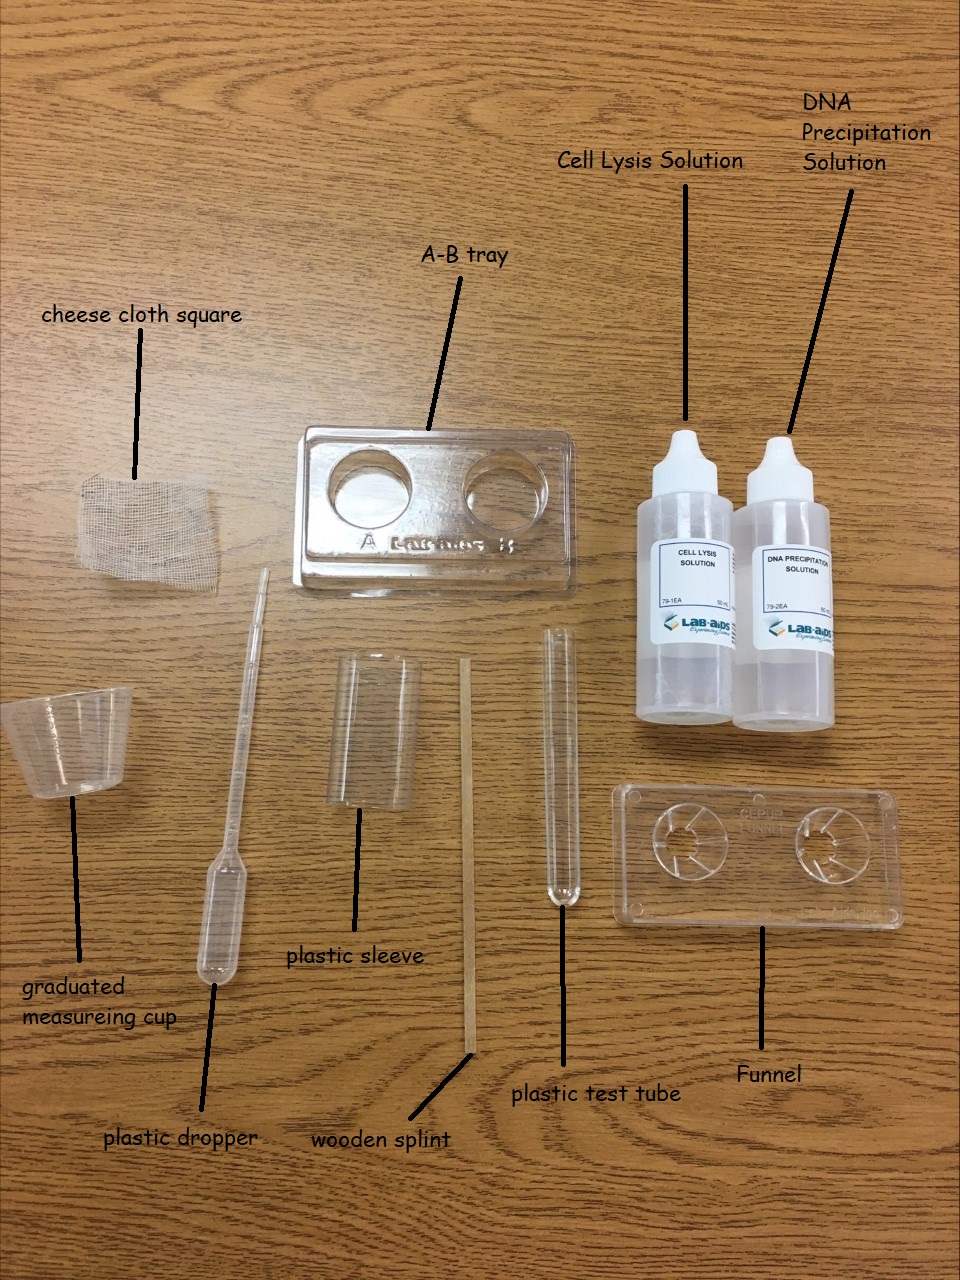
Lab Procedure: Follow these steps carefully to extract the DNA from the berries.
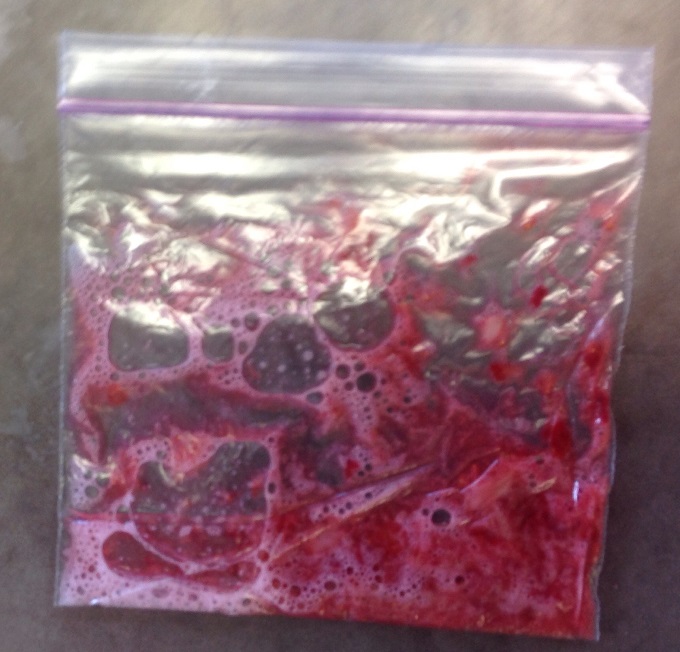
1. Place the raspberries in the zip-loc baggie, seal the bag and squeeze the raspberries back and forth with your fingers until it forms a uniform puree like a "smoothie".
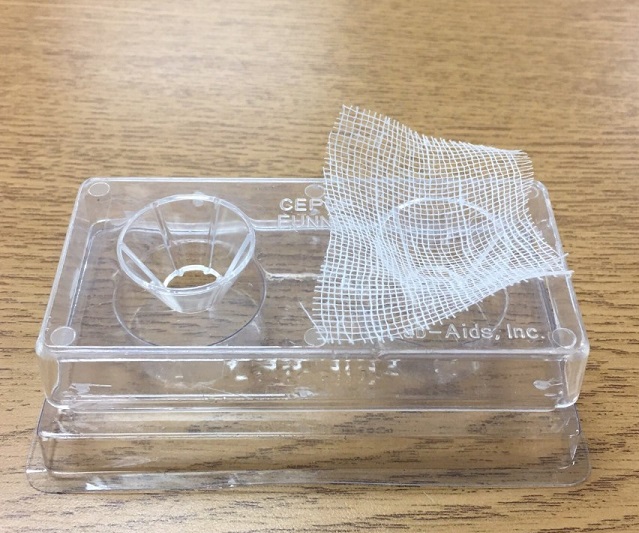
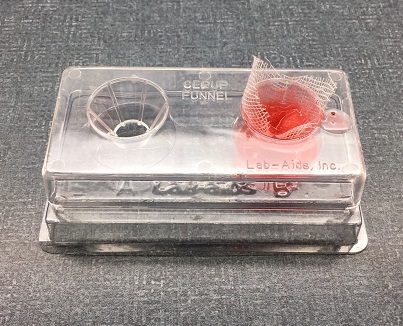
2. Place the funnel on the A-B tray. Place the square of cheese cloth in the funnel so that it is over one of the cavities like the picture below.
3. Measure about 10 ml of Cell Lysis solution in the graduated measuring cup and add this to the zip-loc baggie that has the crushed up raspberries. Swish this mixture for about 1 minute. Try not to make too many bubbles while doing this. Bubbles won't affect the quality of the experiment but when you have to strain this mixture through the cheese cloth, bubbles will slow down the process significantly.
4. Slowly pour the raspberry/Cell Lysis solution mixture into the funnel with the cheese cloth. Let the solution drip for a while. You don't need to filter the entire contents of the bag, you will only need about 20 drops of the filtered solution that collected in the bottom of the A-B tray. This liquid that went through the cheese cloth should be a pinkish-red color and should be free of any pulp from the raspberries. This pink liquid is known as the LYSATE and will contain the raspberry DNA. At this point throw away the cheese cloth in the large garbage can at the front of the room.
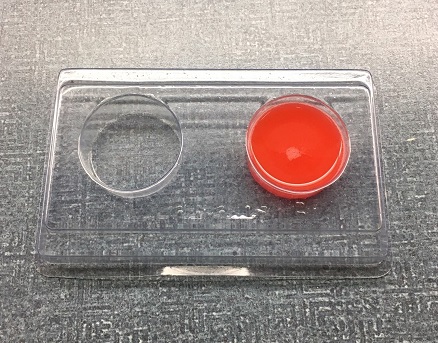
5. Place the plastic sleeve into the empty cavity opposite the lysate.
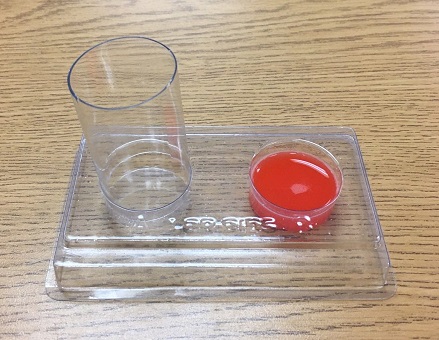
6. Fill the test tube about half full with the DNA Precipitation solution. Just estimate this by sight, it doesn't have to be perfect. Place the test tube in the sleeve so that it is tilted but yet still supported and won't fall over.
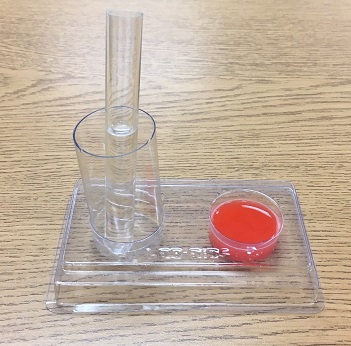
7. Slowly add 15 drops of the lysate solution to the test tube. The lysate is the pink material that you filtered and is in the cavity opposite the test tube. Let this sit undisturbed for about 3-5 minutes and observe what happens.
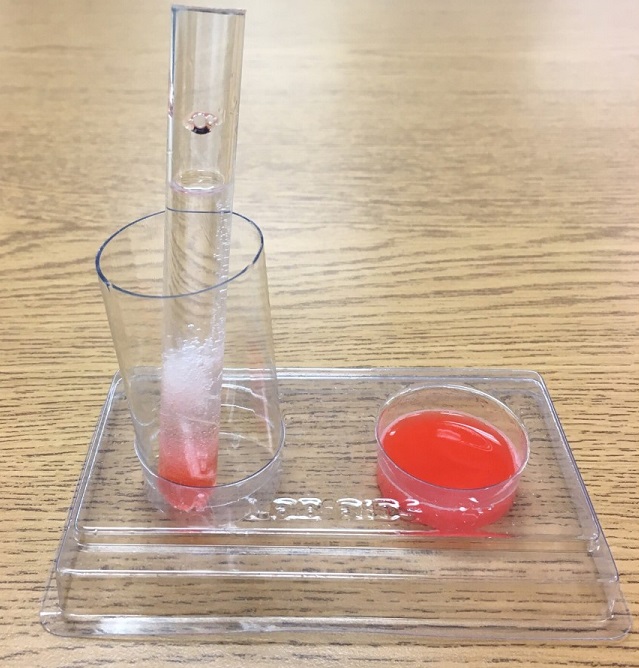
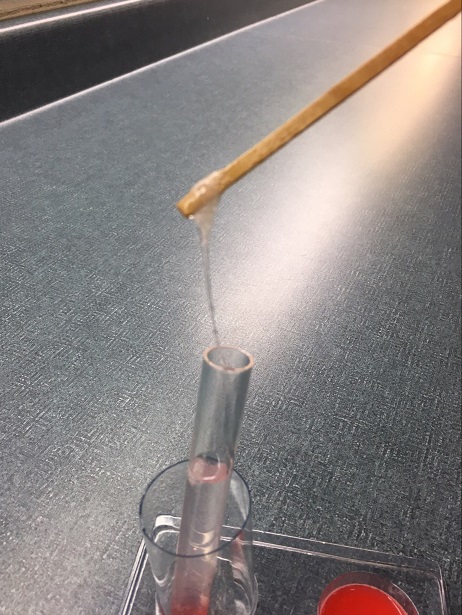
8. The DNA will slowly rise from the lysate layer up into the clear DNA Precipitation solution. Tiny bubbles will form within the matrix of the DNA that begins to solidify and will slowly be carried to the top of the test tube. It may be hard to see at first, but keep observing. The region where the two liquids meet (the pink lysate and the clear DNA Precipitation solution) is called the interface region. It is here in this interface region that the DNA will begin to solidify and become visible.
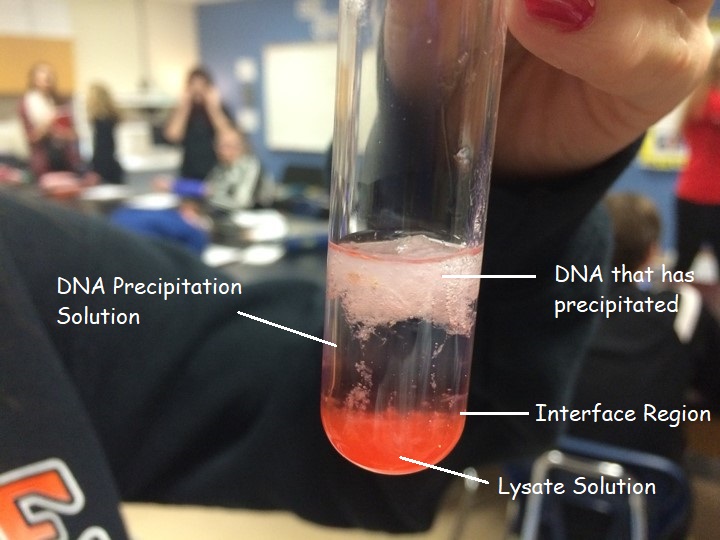
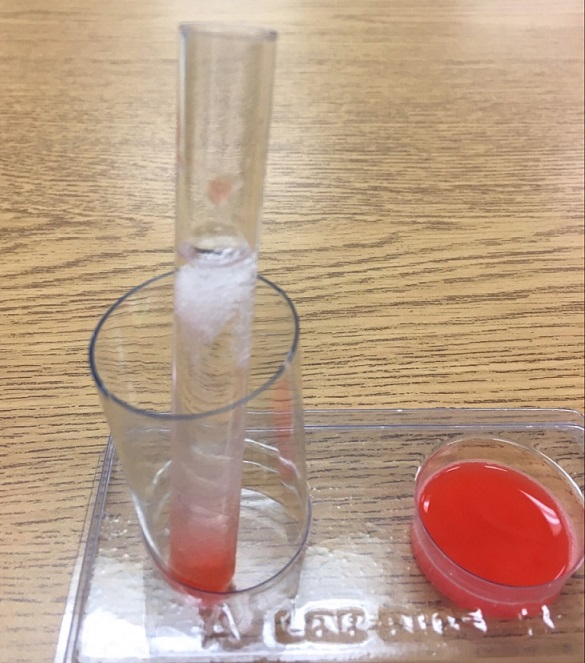
9. Insert the wooden splint into the test tube until its tip is embedded into the DNA. Turn and twist the splint and gently remove some of this material from the test tube. The DNA should wrap around the wooden splint like yarn on a spool. The DNA looks like egg white or mucous, then as it dries, more like a spider web. Gently squeeze out the liquid from the DNA by pressing it against the side of the test tube. Keep twisting the DNA until no more is visible in the liquid. Let the solution sit for a while. Add a couple more drops of the pink lysate solution to the test tube. You will begin to see more DNA precipitate out of the solution. These fibers that you have isolated are millions of DNA strands!
Why did we use the Cell Lysis solution?
The Cell Lysis solution is basically dish washing detergent mixed with distilled water. The detergent was needed to break down the phospholipid molecules in the cell membranes and nuclear membranes. These were the last two barriers that needed to be broken in order to release the DNA from the nucleus of each cell.
Why did we use the DNA Precipitation solution?
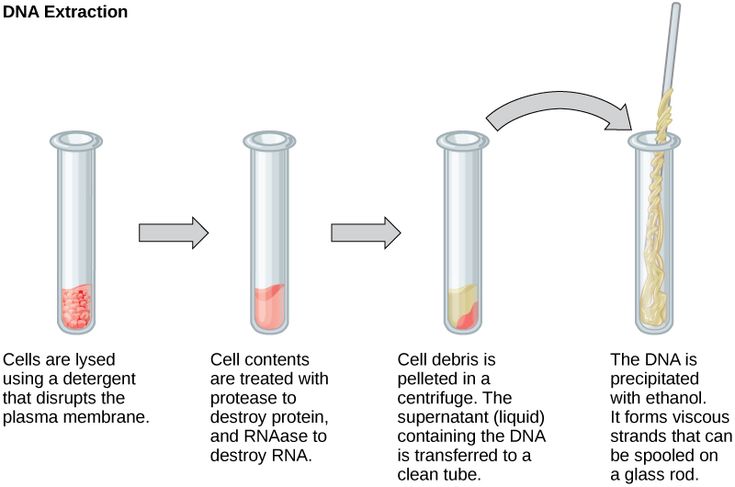
When the DNA molecules were released from the cell and nuclear membranes, the DNA was dissolved in the liquid lysate solution. When one substance is dissolved in another substance, you cannot see it...it is invisible. The DNA Precipitation solution is composed of a type of alcohol called ethanol. DNA molecules are insoluble in alcohols, they will clump together and become visible. This process of "becoming visible" is what is referred to as "precipitate". The DNA "precipitated" out of solution and became visible. Without the alcohol, the DNA would have remained in solution and we could not have seen it. The DNA Precipitation solution allowed the DNA to solidify and become visible to the naked eye.
Clean Up Procedure:
1. Rinse and wash the following items so that they can be used again for the next class period:
2. Throw away the following items that you used:
eye-dropper
baggie with raspberry residue
wooden splint
used cheese cloth
3. Clean the table areas that you used. Use the blue spray bottle to remove any sticky raspberry residue.
4. Restock the tray with supplies for the next class. Use the materials needed list above as a guide to help you.
5. Use the blue spray bottle and clean off all surfaces that you used. Dry with paper towels.
Complete the DNA Extraction Review which is found on JupiterEd. This assignment is due by the posted due date that is found on the whiteboard at the back of the room.
